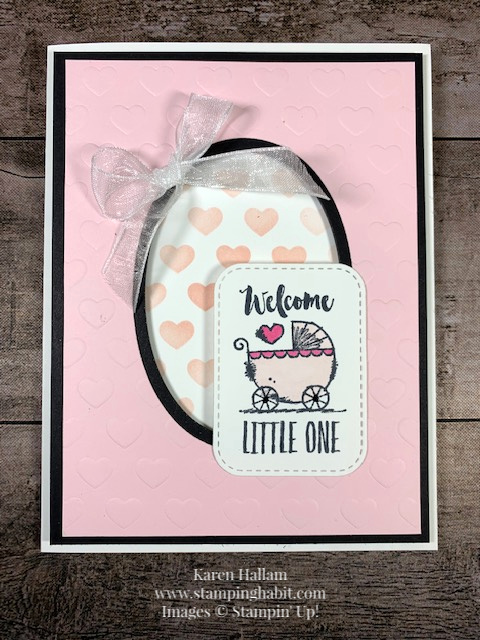
I learned a fun technique today that I thought you might be interested in! I dry embossed with my heart stencil to Welcome Baby Girl!

My main goal was to create a fun platform on which to attach this cute stamp from Witty-cisms. I was drawn to this stamp set when I first opened the catalog. It was developed by Million Sales Achiever Lisa Fast, and you can find it on page 37 of the Spring Mini Catalog. View and order it here.
Embossing Technique
To dry emboss with a stencil, you need a die-cutting/embossing machine (like my trusty Big Shot). You will need a multi-level platform and a blue embossing plate from Stampin’ Up! Pick your desired stencil and add an embossing pad (I have one from Spellbinders). It took me a few tries to get the “sandwich” put together correctly. Here is what I found worked best with my equipment: My Sizzix Platform all the way open, the Spellbinders embossing pad, my cardstock, the stencil, and my blue embossing plate on top of it all. When I ran it through my Big Shot, it pressed the little hearts from the stencil into my cardstock and it came out perfectly embossed. I was so excited!
Add Some Stenciling
With the same heart stencil, I sponged some pink ink onto another piece of cardstock. Then I cropped out ovals on the pink and black cardstock pieces with the Layering Ovals Dies.
Last, I added the little baby carriage image from Witty-cisms by putting Dimensionals along the left side and a bit of glue to the right side. A translucent bow to the top left added some balance to the card that I was wanting. Welcome Baby Girl!

Witty-cisms is the stamp set that I’m featuring in my monthly tutorial package. When you make any purchase of $40+ from my Stampin’ Up! online store, I will send you three free and exclusive tutorials for mini cards I’ve made using these cheeky stamps. As an added bonus, I have created a little box to put them in and I will send the tutorial for that as well!
I hope you will play around with this technique and discover some new embossing possibilities that you have! Who knew you could use a stencil for dry embossing?!
Come back on Wednesday. I’ll be participating in the Pals March Blog Hop. We are showing off projects with critters on them! Should be a fun Hop! See you then!

Ordering Info
Shop Stampin’ Up! in my online store to cover any of your paper crafting needs. To find the specific products that I used on this card, you can click on any of the pictures below. When you order, please use my March Host Code 2Z42J4FX, for orders under $150. For a larger order, do not use the code. You will be able to use your own Stampin’ Rewards and receive free products.
Product List
|
|
||
|
|
|
|
|
|
|




Very cute. I have tried doing the stencils for embossing and have had some luck but usually my stencils and embossing stuff sit all lonely as I forget to use them. I know that is silly. I need to play. I have a coffee bean stencil, maybe when my SAB coffee/tea set comes, I can try it out.
Such a charming card! Thanks for the tips with the stencil for embossing. Love the effect.
Adorable…just the sweetest’