Last week, Rosanne Mulhern and I brought you a CASEing Coast to Coast with the theme of Paper Piecing. We each made a card with our personal take on the technique. See it HERE if you missed it. I showed you this alternate card using a different style of the same technique. I thought it worthy to show you more details. Here is my “So Thankful For You” paper pieced card.
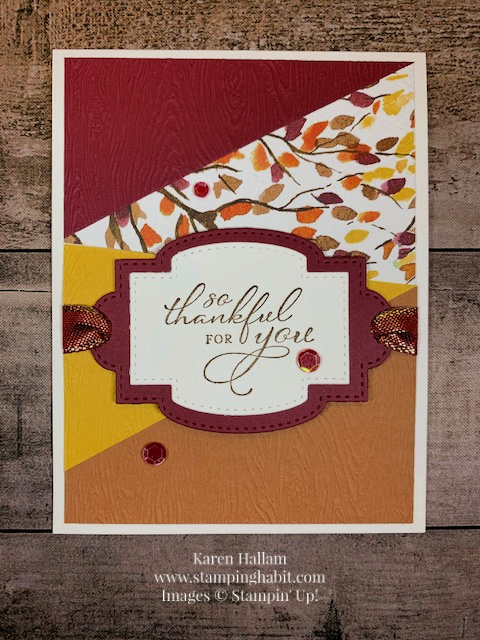
I cannot take credit for the original design. That belongs to Linda Heller. But I used different papers and changed it up slightly. The Designer Series Paper is from Beauty of the Earth and the cardstock colors are Merry Merlot, Bumblebee, and Cinnamon Cider.

The sentiment from Pretty Pumpkins sits on labels from Stitched So Sweetly Dies. It’s stamped with Early Espresso. That gorgeous ribbon is a Gold/Cherry Cobbler mix. I punched holes on either side with the Detailed Trio Punch. The sequins are from the Artistry Blooms pack.
Paper Piecing Technique and Assembly
- Cut each of the following papers 5-1/4″x 4″: DSP, Merry Merlot, Bumblebee, and Cinnamon Cider. This will be enough for you to make 4 cards!
- Stack the 4 papers, turn them upside down. Mark on the back of one piece with a ruler and pencil, angling each line to make 4 triangles. Holding the 4 sheets together, cut along the drawn lines using a guillotine cutter. Turn them right side up and keeping them in order, piece four card fronts together.
- Cut 4 pieces of copy paper 5-1/4″x 4″ to glue the “puzzle parts” on. Each one will be in a different order.
- Once they are glued to the copy paper, run them through your embossing machine, using an Embossing Folder of your choice. I’ve used the Timber 3D Folder on mine.
- Cut labels with Merry Merlot and Basic White using Stitched So Sweetly Dies. Stamp your sentiment on the white one. Glue them together and punch holes on either side.
- Cut a piece of ribbon 5-6″ long, draw each end up through the holes. Place Dimensionals on the back of the label, then adhere it to the card. Wrap the ends of the ribbon around to the back and adhere with Stampin’ Seal.
- Glue the entire card front to a base of Thick Basic White, 11″x 4-1/4″, scored and folded at 5-1/2″ for a top-fold card.
- Add sequins.
Hints/Tips
- Pick a DSP that has at least three colors in it to match with cardstock.
- I would have preferred a bolder font on mine, or perhaps a darker inking and heat embossed with Clear Emboss Powder.
- If my directions fail you and push comes to shove, here is the link to Linda’s video: https://www.youtube.com/watch?v=mXNe-Km2aWw&t=10s. You will enjoy her instruction with the easy-to-follow video! Get out the popcorn and enjoy!
Do you need to order any materials to make this card? Each of the supplies is listed below and linked to my online store. Simply click and shop! When you do, please use my current Host Code during check out. For August my code is NX7RAK2B. I have a Host Gift for you when you order $75 + and use the Host Code…
*My August Host Code Gift*
Type the current Host Code (NX7RAK2B) in the box provided
when you place an order of $75 or more before tax & shipping, and I will send you
the Cute Stars Adhesive-Backed Sequins in September.

The black, purple, and orange stars are fun for Halloween, of course, but also great on many other projects as I’ve found!
Thanks for stopping by today! I know I’ve been a bit inconsistent the past week or two, and unfortunately that will continue a bit longer. Sometimes life gets in the way! There is a lot going on right now, but when it settles I’ll be back on a regular schedule. Thanks for your patience. I’m so thankful for you! And I appreciate your support.
Stampin’ Hugs,

Product List
|
|
|
|
|
|
||
|
|
|






Thanks, Hope!
Love this design. Also like the efficiency of 4 for 1! Thanks to you and Linda.