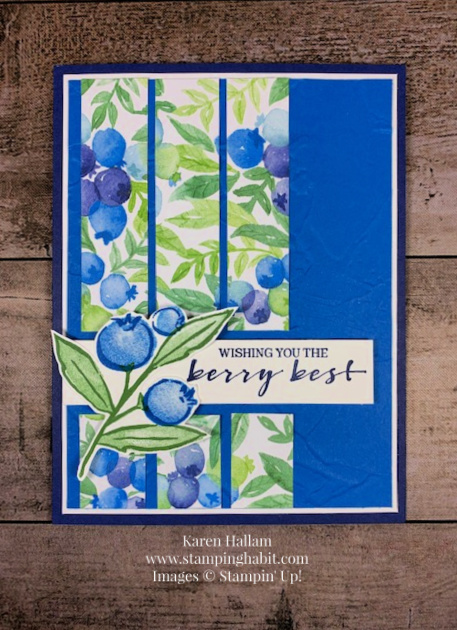
Welcome to our CASEing Coast to Coast for February! This month Rosanne and I are using a card sketch from My Favorite Things as our design inspiration. If you are new to my site, my friend Rosanne (in Pennsylvania) and I (in California) take turns designing and CASEing (Copy and Selectively Edit) each other’s cards. Here is my card:

And here is the MFT Card Challenge Sketch that we used:
You can see our cards on the MFT web page HERE. We decided it would be fun to enter their challenge in addition to CASEing each other’s cards this time.

Materials & Measurements:
- Night of Navy Cardstock, cut at 8-1/2″x 5-1/2″, scored and folded at 4-1/4″
- Basic White Cardstock, 5-1/4″x 4″- two pieces, one for the inside
- Pacific Point Cardstock, 5-1/8″x 3-7/8″, embossed with Painted Texture 3D Embossing Folder
- Berry Delightful Designer Series Paper, cut in three strips at 3-1/4″x 3/4″, and three at 1-1/4″x 3/4″
- Basic White Cardstock, 3-15/8″x 3/4″
- Basic White Cardstock scrap to stamp leaves and blueberries from Berry Blessings Stamp Set
Directions:
- Glue one of the white cardstock pieces to the front of the card base and one to the inside.
- Run the Pacific Point Cardstock through the Cut & Emboss Machine with Painted Texture 3D Embossing Folder. Glue it over the white layer.
- Glue the blueberry DSP strips to the front toward the left side as shown. The longer three at the top half and the short pieces below. It’s nice to line them up in such a way that the pattern or print on the paper seems continuous both side by side and top/bottom.
- Stamp the sentiment from Berry Blessings in Night of Navy on the right side of the white strip. attach it to the card with Dimensionals.
- Stamp the leaves and blueberries on a scrap of white cardstock using Garden Green and Pacific Point. To make the inside solid images lighter, stamp off once on scrap paper before stamping on your image. Fussy cut around the leaves and berries, then glue the center portion to the sentiment strip to the left of the sentiment. You may want to add a Dimensional under the part that hangs over for stability.
Free With Sale-A-Bration!
I love this mix of blues and greens. This paper and stamp set are a FREE Sale-A-Bration bundle that you can get with a $100 purchase from Stampin’ Up! The set also includes raspberries. See a card I made with that paper HERE. Sale-A-Bration is winding down. It will end on Feb. 28. Don’t miss out on getting some awesome free products!
Are you excited to see Rosanne’s card?! Me, too!!! Let’s head east and see what she has made. Click HERE.
Thanks so much for visiting our sites today. We would love to hear your comments! Come back and see us again. We normally publish CASEing Coast to Coast on the third week of every month. See you again soon!
Product List
|
|
||
|
|
|
|


Thank you so much for sharing this sketch and your beautiful card. I will be CASEing
Fabulous card, Karen! I love the sketch and I might just give it a try!
Very nice Karen! Love the layout. I feel another CASE coming on!
This was another fun CASE! I’m so inspired by your card and can’t think of a thing to change!
Hi Karen… This is a simply beautiful card and I adore that layout! I am going to totally case this layout and I thank you for your inspiration… Off to Roseanne site next!
Love this blueberry card, just too sweet! Love how you and Rosanne used the sketch. It was fun to see both versions on Rosanne’s blog. Gotta try CASEing it sometime.