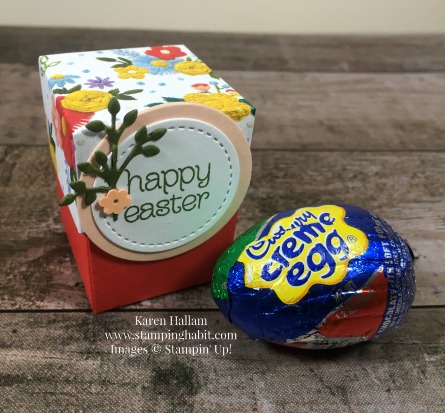
I created this cute little Easter Egg Box – perfect size for a Cadbury Creme Egg or Reese’s Peanut Butter Egg! I made it in four different colors, using Needlepoint Nook DSP for a jumping-off point. They will be my thankyou gifts for my class participants this month. Aren’t they sweet? And they are surprisingly easy to make!
Bottom part of box:
5-1/2″ x 5-1/2″ cardstock, scored at 2″ on all four sides. Fold and burnish all score lines.
Snip up to the horizontal score line, two on each side. See template for placement. Wedge in slightly on all four corner tabs. Don’t cut into the center tabs.
Cut each of the four corner tabs in half for a better fit when folded up. This will become obviously necessary when you try to fold them up toward the middle!
Put glue on corner tabs and fold them up and inside the middle tabs to create the box.
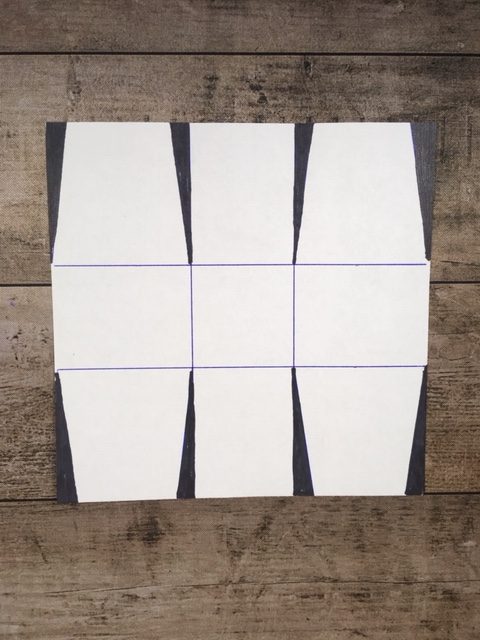
Template
Box Lid:
3-1/2″ x 3-1/2″ DSP of choice, score at (slightly) less than 1″ on all four sides. Fold and burnish all score lines.
Snip, wedge, and glue in the same manner as the bottom of box.

Needlepoint Nook Designer Series Paper
Decoration:
Scrap Whisper White cardstock. Cut a Stitched Circle using the smallest of the framelits.
Scrap Colored Cardstock. Cut a 1-5/8″ circle using the Layering Framelits Dies.
Stamp sentiment and embellish with a floral framelit and a flower-shaped Self-Adhesive Sequin.
Color Options:

Balmy Blue, Poppy Parade, Petal Pink, Daffodil Delight

The egg fits perfectly into the box with a little bit of shredded paper “grass.”

Here you can also see how the sides fold in and cross over each other when glued together. The lid fits snug enough to stay on – but at the same time, easy to open and close. The trick is to just score a teeny tiny bit inside the 1″ line.
Finished size = 2″ tall, 1-1/2″ wide, 1-1/2″ deep
Give it a try! Happy crafting!
Sign up for my Newsletter
Would you like to subscribe to my free monthly newsletter? I offer more tips and inspiration along with all the latest updates from Stampin’ Up! as they come to me. I also offer a free project tutorial for those who sign up for my newsletter mailing list. Sign up HERE!
If you are not currently working with another Demonstrator, I would love to have your business! You can order Stampin’ Up! products from me through my online store. Click HERE to browse and shop. Thank you!

Product List
|
|
|
|
|
|
|
|





So cute!!! What set is the sentiment from? Will definitely be copying these. Thank you for sharing.
Hi Susan! Thanks, glad you like it and will make them. The stamp set I used is an old one called Circle of Spring. If you don’t have it, there is a cute stamp in the current Occasions Catalog “Easter greetings” in the set, Fable Friends. It would fit the circle and is a sweet font.
I have Circle of Spring. I knew I had seen it somewhere. Thank you!!
Such a “sweet” project! Exactly what I needed for this Easter’s treat to my friends and colleagues. Thank you for the inspiration!
Thank you! I’m glad you can use it. 🙂
The boxes are very cute. Thanks for the instructions. Can’t wait to make them.
Thanks, Shila!
Karen, these are super sweet. I love the petite size and your embellishments are just perfect. Thanks for the tutorial, too!
Hi Rosanne! Thank you!
YIPPEE SKIPPEE…..I am super excited as I just love sweet projects like this and even better with the stellar instructions you gave!!!! Thanks (again!!!) for your inspiration!
Thanks, Susan! These were a lot of fun 🙂
Very sweet. Who wouldn’t love to have one of these happy boxes with a treat in it?
Thanks, Chris!
Oh so cute!!! Love your color choices.
Have a blessed day.
🙂
Thanks, Nancy! This paper is great for color!