Blending a beautiful sunset is easy with Stampin’ Up! Blending Brushes! If this is a new technique to you, let me show you how to blend a sunset.

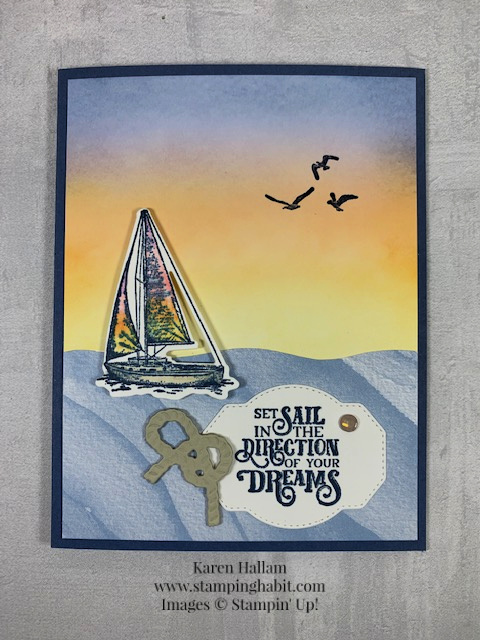
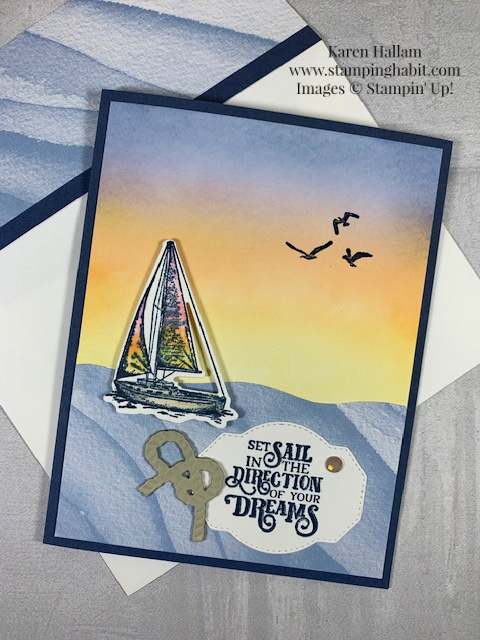
This is the card I made, using the Sailing Home Stamp Set and Smooth Sailing Dies. I love this set for a graduate or someone taking on a new chapter in their life.
Steps to Creating a Sunset(rise)
- Make a mask. I took a scrap of white cardstock and cut a gentle curvy line at the top, then lined it up where I wanted the horizon on my 5-1/2″x 4-1/4″ piece of Basic White Cardstock.

- Start at the point where the mask meets the paper and apply So Saffron with your Blending Brush. Load up the brush, tap off the excess onto scratch paper, and lightly swirl the brush right to left across the “horizon.” Always begin off the paper so you don’t get a real heavy blob of color at the beginning. But if you do get it a little dark on the edge, you will be trimming those edges off anyway before adding it to your card. Saffron is very light. Go over it a few times, keeping a light touch.
- Leaving the mask where it is, start the blending process with Pumpkin Pie. Lightly! Go across the paper and as high as you want that color. Then go back and brush along the spot where the two colors meet with the yellow brush (I have one brush for each color) to blend the two together even more.
- Repeat the process with the next color ~ I used Flirty Flamingo.
- Last, at the top, I used Misty Moonlight.
- Blend between each color to smooth out the transitions. The brushes give such a smooth blend, better than any other sponging tool I’ve ever tried. Then pull away your masking paper to reveal!

Build the Card
- Using the masking paper as a template, I cut a piece of “water” with Sand & Sea DSP to match the white area on the card front, then glued it into place.
- At this point I trimmed the paper down to 5-1/4″x 4″.
- Next, I stamped the birds with Night of Navy.
- “Set sail…” is Misty Moonlight and I cropped it with the label die in the set.
- The rope is Sahara Sand Cardstock. I cut three and glued them on top of each other for a more substantial rope with a bit of dimension.
- The sailboat is the larger of the two in the set. I stamped it with Misty Moonlight and colored it roughly with Blends, then adhered it with Dimensionals.


As with any new technique, the more you practice, the better you get. I’ve not been doing this very long, so you can see that it doesn’t take too much practice to get a nice blended look! It’s fun ~ give it a try!

All of the products I used are listed below and they are linked to my online store for easy shopping ~ pick & click! When you order from me, please add my Host Code at the check out page. For June, my code is KA4VWVMY. Thank you! My offer for five Gold Foil “hello” die cuts is still available throughout this week with any purchase. See it HERE. Happy crafting!

P.S. The board I used to work on is called Make Art. It is a metal board and it comes with four strong magnets and a magnetic ruler. I also love it for stenciling. It’s not SU, but I know some of you will want to know what it is. I find it very handy!
Product List
|
|
|
|
|
|
||
|
|
||
|
|


Beautiful! And I have everything already but you gave me some much need inspiration and techniques to try too
I’m so glad, Colleen! Have fun with the process! Thank you!
So impressive! You make me believe that I can create this card and maybe I can because I have all the elements. It’s very beautiful. TFS
I’m sure you can, Judy! Thank you so much!
Lolve this!
Thank you!
Gorgeous!
Thanks, Linda!
A very beautiful card. Thanks for the tips.
Thanks, Cheryl!
Beautiful….just beautiful and your directions are so clear…thanks for sharing!
Thanks, Susan!