Welcome to our October edition of CASEing Coast to Coast! This month, Rosanne and I are showcasing shadow box cards. Each month Rosanne (from Pennsylvania) and I (from California) choose a theme and take turns CASEing each other’s cards. I haven’t made one of these shadow box cards in a long time and thought it would be fun to dig out this old technique! Here is CASEing Coast to Coast: Shadow Box Cards!

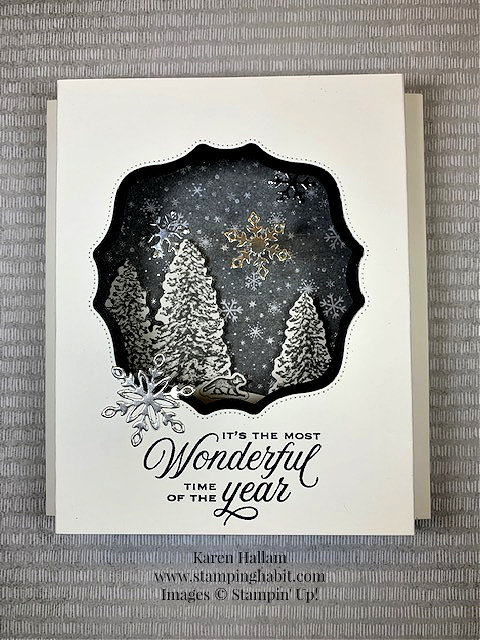
Shadow box cards, or sometimes called diorama cards, are a fun way to create a little 3-D scene that folds down to fit into a regular A2 envelope. For this one I’ve chosen the Peaceful Place Suite to create my little snowy scene. Let me tell you how simple it is to make one!
To Start:
Begin with Thick Basic White Cardstock, two pieces, cut at 6-1/4″x 5-1/2″. With the paper in landscape position, score both pieces at 1/2″ and 1″ on both sides to create little Z-folds. They will fit together on the sides to make the shadow box. Here is a top-view to show you what I mean ~

On the piece that will be your front, you will want to cut a hole of some shape. I used the largest die from the Hippo Dies for my opening, but circles, squares, ovals, rectangles – anything will do. It is easiest to use the layering shapes dies in order to get the little border around the opening. You will need a piece of colored cardstock that is cut just slightly under 5-1/2″x 4-1/4″on which you will cut the same shape opening with a smaller die. Since I used a die that doesn’t layer, I traced the Hippo Die onto Basic Black cardstock and hand-cut the opening. Once it’s cut, glue it to the back of the front piece so there is a colored border around your opening.

That extra layer gives the card stability. Plus it looks good!
Next Steps:
Stamp your sentiment on the front piece. I chose one from Tidings and Trimmings and stamped it with Memento Tuxedo Black ink.
Your card is still in two pieces at this point, so choose a paper that you want to use for your background. I picked the sparkly, starry gray and white paper from Peaceful Place DSP. Cut it just under 5-12″x 4-1/4″ and glue it to the inside of your back piece.
Now the fun part! What do you want to put inside your shadowbox? You get to create a little scene. Sticking with the Peaceful Place Suite, I stamped and cut the trees from Peaceful Cabin using Basic Gray ink and Basic White Cardstock. Then I adhered them to the inside of the back piece with Dimensionals. I added the little fox (he is too cute!) and some die-cut silver snowflakes to the sky.
For a third dimension, I cut a silver snowflake and glued it to a strip of Window Sheet, or acetate, and glued the end of the acetate between the front and back pieces at the Z-folds. It looks like it’s suspended in the air and has some fun movement to it when you pick up the card.
Put It Together:
Now that the insides are all complete, you will glue the front to the back with some strong Tear & Tape or Multipurpose Liquid Glue at the two 1/2″ end flaps that you created with the Z-folds. See the top view picture above for an example.

Here it is standing up. You have 3 dimensions ~ the front, the decorated back, and the fun snowflake suspended between the two. Use the back to write a personal note and sign your name.
HERE is another sample of a shadow box card that I made in 2019!
If you’re a visual learner like me, you may want to watch a video to see how one of these cards go together. Jennifer McGuire has an excellent video from about 6 months ago that would be helpful for you. The link is https://www.youtube.com/watch?v=rf7VUT_jN8I. The first 10 minutes will show you everything you need to know.
Ready to see what Rosanne has made? I am too! Let’s transport over to the East Coast with a click of your mouse and see what beautiful creation she has built. Click HERE!
Thanks for joining us today! I hope you’re inspired to try a shadow box card. Happy creating!

I have a Host Gift for everyone who orders from me during the month of October with a minimum of $50 before tax & shipping! All you have to do is use my Host Code when you place your order and I will send you your gift in November. Here it is ~
October Host Code =
Y4F3WHUG
*My October Host Code Gift*
Type the current Host Code (Y4F3WHUG) in the box provided
when you place an order of $50 or more before tax & shipping, and I will send you
the Adorning Designs Decorative Masks in November.

Product List
|
|
|
|
|
|
|
|
|
|
|
|


Absolutely beautiful! A wow project!
Thank you so much for the detailed instructions! Beautiful card, and I can’t wait to try one myself!
Karen
This card is beautiful! Love the idea of the suspended snowflake. Awesome job!
Thanks, Terry!
Thanks, Susan. They are fun to make!
Like I said in my post, your card is so classically beautiful, Karen. Another fun CC2C!
Thanks, Rosanne!
Karen, this is a WOW card!!!
Thanks, Michelle!
Great card and reference for “how to.” Must create one for my next set of kits. Thank you so much for sharing your creations!
Thank you so much!