I’m so happy to hear that some of you have enjoyed my Basic Stamping series this week! I hope it has been of help to you! Today will be my final post of the series, but I’m thinking of dedicating a day per week on some basics for those of you who are newer to the craft and don’t have a huge supply of tools and supplies with which to work. I was there once, and it took me a long time to build up my supply of stamps, paper, ink, and tools. It’s a process and you work with what you have.
I will say that if you will purchase one punch, one new color, and one new stamp set or pack of paper each month, it’s affordable that way, and before you know it – you have lots to work with! When you can afford a big purchase like a Big Shot, then you can start accumulating framelits and thinlits. BEFORE you do purchase a Big Shot – please, please, please talk to me about our Joining Special. It makes so much sense and you will save a good chunk of change ~ and who doesn’t like that?!
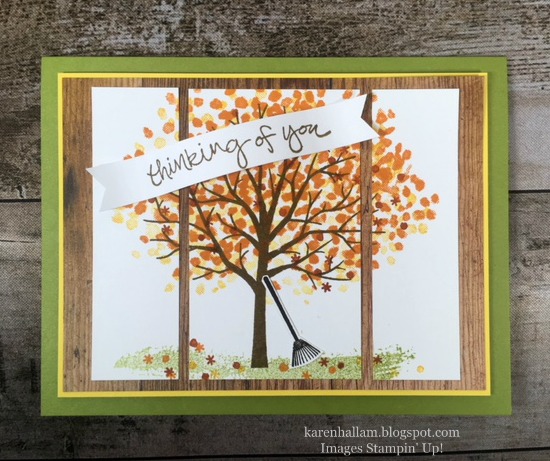
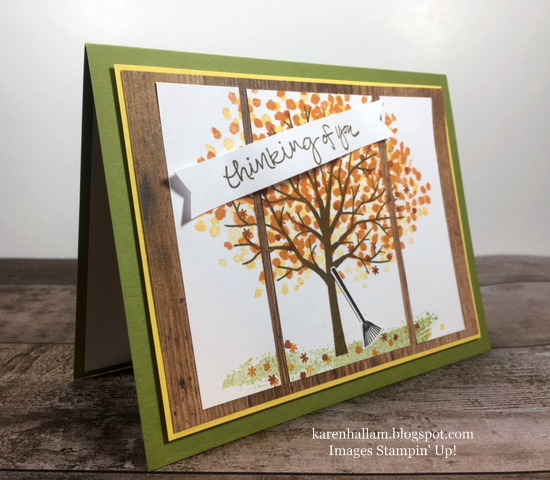
For today’s card, I’ve created some layers for visual interest. I hope you like this affordable way to create a beautiful and interesting card. Take a look ~
I picked a Fall theme just to show you how much mileage you will get with this stamp set. It will take you through all four seasons! After stamping it onto white cardstock, I went to work creating my layers.
I started out on a bigger piece of cardstock but cut it down to the size I wanted for my layers.
First, the card base in Old Olive is a standard 5-1/2″ x 4-1/4″ size. Then Daffodil Delight, cut to 5″ x 3-3/4″. The woodgrain piece of DSP is from the 6″ x 6″ pack of Wood Textures Designer Series Paper. I cut it to 4-7/8″ x 3-5/8″.
*TIP: When cutting layers, it’s really easier to begin with equal sizes of papers, then slicing off 1/8″ on two sides of the piece you want for the top. If that’s not enough of a layer for your look, slice off another 1/8″. Cut, look at it, then glue it down. I’ll call it the “slice and test” technique :-)!
For the art piece, I did the slice and test technique until I got the paper down to 4″ x 3-3/8″. Then I cut it into three panels, with cuts at 1″ and 2″, creating panels that measure 1″, 2″, and 1″.
I glued the white and wood textures pieces directly to the layers below them, but I popped the yellow layer up on Dimensionals to attach it to the card base.
I stamped and hand cut the little rake out, then glued it on. That gave it a little stand-out rather than stamping it directly to the paper.
The banner: This is a 1/2″ x 3-1/2 ” strip of Whisper White that I stamped then curled with my Bone Folder. You can also use a pencil for this. Run the paper across your Bone Folder or pencil until it curls down (as if you were curling ribbon for a present), then do the same in the opposite direction on the ends. Attach with Glue Dots on either end. Some instant dimension and interest to your card!
Sale-A-Bration
Sale-A-Bration is on right now until March 31st. With every $50 you spend, you will get to choose one free item in the SAB Brochure (see side bar). This is a great way to add to your stamp set collection, get some beautiful designer series paper, or some gorgeous ribbon – for free! Click HERE to read more about Sale-A-Bration.
Starting today, Feb. 16, a second release of Sale-A-Bration products will be available to earn! Two new Level 1 products and one Level 2 product bundle will be available, and they are fabulous.
Click HERE to see the 2nd Release Brochure. I love that basket stamp and embossing folder! And the paper. And the stamps. Oh, yeah!
Newsletter
I want to invite you to sign up for my monthly newsletter (click HERE) where I offer exclusive tips and inspiration along with the latest news from Stampin’ Up! concerning new products and promotions that they will be offering. I am currently offering new subscribers a free PDF for my desk calendar/Post-it note holder. And the first 8 people to sign up will receive a free Mini Tear-Off Calendar that fits perfectly onto the project.
Shop
In addition to sharing projects with you, I also sell Stampin’ Up! products through my online store, and I invite you to shop with me any time! I appreciate every one of my customers and will mail out a monthly thank you gift to everyone who shops through my online store.Use my Host Code GWJX7B9F for purchases under $150.
All of the products I used in today’s project will be listed below in the Product List. They are linked to my online store, so shopping is just a click away.
Thanks for visiting my blog today! Have a great weekend! And get into the stampin’ habit!
The content in this blog is the sole responsibility of Karen Hallam as an Independent Stampin’ Up! Demonstrator. The use of and content of classes, services or products offered is not endorsed by Stampin’ Up!