


Welcome back to my week-long series on Basic Stamping! If you missed Days 1-3, you can see them HERE, HERE, and HERE. I am going back to stamping basics, using few materials and some easy techniques that everyone can do.
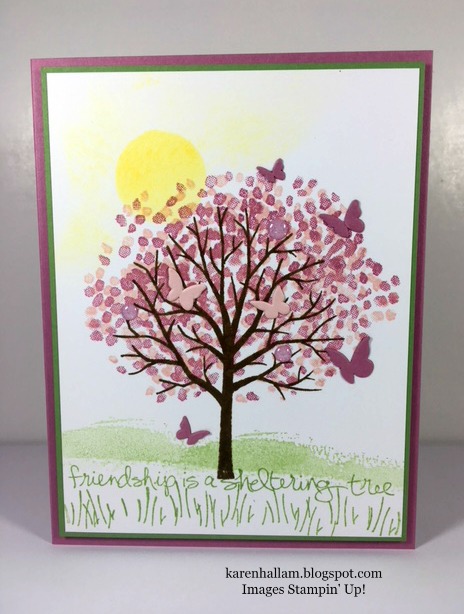
Today I’ve got a Spring card, once again using the Sheltering Tree stamp set, but adding some new colors and some sponging to create a sun behind the tree.
I started with a piece of thick Whisper White cardstock, measuring 5-1/8″ x 3-7/8″. I used Soft Suede for the trunk, then used two shades of pink for the blossoms – Powder Pink and Sweet Sugarplum. I offset the two colors just a little and by doing that I’ve created some depth to the tree. The grasses below the tree are stamped with Wild Wasabi. I snuck the sentiment in there using the same color, in hopes that it looks like the grass and is kind of subtle. Did it work?
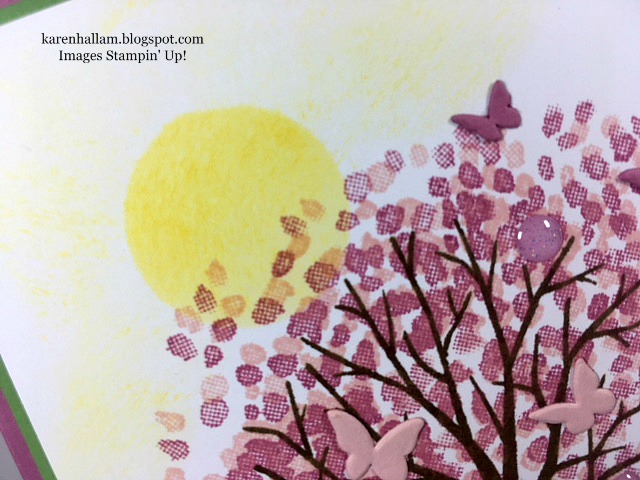
Now for the sun…

In yesterday’s post, I made an oval mask with a Post-it Note. I’ve done the opposite thing here by punching a one inch circle in the sticky part of the note and placing the hole just to the top left of the tree. Then with Daffodil Delight ink, I sponged in the circle. I used a circular motion with the sponge and gave it a few layers until I was happy with the color.

After removing the mask, I took the sponge and gently swiped it from the sun toward the edges of the paper to give the illusion of sun rays or glow.

I glued the white panel to a slightly larger piece of Wild Wasabi cardstock – 5-1/4″ x 4″ – and put Dimensionals on the back. Then I adhered it to the Sweet Sugarplum base card – 5-1/2″ x 8-1/2″ scored and folded at 4-1/4″.
To finish the card I added three pink Glitter Dots, and because I couldn’t help myself, I added several small butterflies that I cut from the two shades of pink using a retired framelit die set. Tiny flowers would also look pretty!
I just love the pretty Spring colors in this card. I hope you’ll give the sponging a try! It is super easy!
Come back tomorrow for the final post in this series BASIC STAMPING 101. If this has been helpful to you, would you please leave me a comment below? I want to hear from you and it will help me know if this is of value to anyone! Any questions? I will answer them right away. So please ask! ***(If you are visiting this post through your email, click on the title of the post to leave comments or to pin any images to Pinterest.)***
Sale-A-Bration
Sale-A-Bration is on right now until March 31st. With every $50 you spend, you will get to choose one free item in the SAB Brochure (see side bar). This is a great way to add to your stamp set collection, get some beautiful designer series paper, or some gorgeous ribbon – for free! Click HERE to read more about Sale-A-Bration.

Starting tomorrow, Feb. 16, a second release of Sale-A-Bration products will be available to earn! Two new Level 1 products and one Level 2 product bundle will be available, and they are fabulous.
Click HERE to see the 2nd Release Brochure. I love that basket stamp and embossing folder! And the paper. And the stamps. Oh, yeah!
Newsletter
I want to invite you to sign up for my monthly newsletter (click HERE) where I offer exclusive tips and inspiration along with the latest news from Stampin’ Up! concerning new products and promotions that they will be offering. I am currently offering new subscribers a free PDF for my desk calendar/Post-it note holder. And the first 8 people to sign up will receive a free Mini Tear-Off Calendar that fits perfectly onto the project.
Shop
In addition to sharing projects with you, I also sell Stampin’ Up! products through my online store, and I invite you to shop with me any time! I appreciate every one of my customers and will mail out a monthly thank you gift to everyone who shops through my online store.Use my Host Code GWJX7B9F for purchases under $150.
All of the products I used in today’s project will be listed below in the Product List. They are linked to my online store, so shopping is just a click away.
Thanks for visiting my blog today! Have a great one! And get into the stampin’ habit!
Karen
Product List

|

|

|
|

|


Discover more from Karen's Stamping Habit
Subscribe to get the latest posts sent to your email.


Karen. Thanks for sharing this card and, the tips and tricks that makes this card "just my style". I appreciate your talent and your ease of explaining step by step how to duplicate this project. Thanks again
Hi Karen! I love this series!! You give such clear and easy to follow directions! Pretty card too!
Thanks for the encouragement, Jeanie! I appreciate your comment!